VRM Settings
Overview
VRM (Virtual Reality Model) is a 3D character model format, and in AITuberKit, you can use VRM models to display AI characters.
Environment Variables:
# Path to the selected VRM model
NEXT_PUBLIC_SELECTED_VRM_PATH=/vrm/default.vrm

# VRM character lighting intensity (0.1-3.0)
NEXT_PUBLIC_LIGHTING_INTENSITY=1.0

# Enable/disable thinking pose (true/false)
NEXT_PUBLIC_THINKING_POSE_ENABLED=false

# Pose ID to display while thinking
NEXT_PUBLIC_THINKING_POSE_ID=think
Preparing VRM Models
AITuberKit supports the following VRM versions:
- VRM 0.0
- VRM 1.0
To use a VRM model, follow these steps:
- Prepare a VRM file (.vrm extension)
- Place the VRM file in the
public/vrmdirectory - Select the VRM model in the application
Loading Models
Selecting from Options
VRM models available in the application can be selected from a dropdown menu. The model switches in real-time when selected.
Uploading New VRM Models
By clicking the "Open VRM" button, you can upload a local VRM file to use in the application. The uploaded VRM file is automatically saved in the public/vrm directory and added to the selection options.
How to Manipulate the Model
The 3D model can be freely adjusted with the following mouse operations:
Adjusting Position, Orientation, and Size
- Right-click + Drag: Moves the avatar's position
- Left-click + Drag: Rotates the avatar's orientation
- Mouse wheel scroll: Enlarges or reduces the avatar's size
By combining these operations, you can adjust the placement of the avatar on the screen to an optimal state. Feel free to customize how the character appears to match your screen composition.
Lighting Intensity
The lighting intensity of VRM characters can be adjusted using the environment variable NEXT_PUBLIC_LIGHTING_INTENSITY. Values can be set in the range of 0.1 to 3.0.
Thinking Pose
A feature that automatically displays a specified pose while waiting for the AI response after sending a message.
Environment Variables:
# Enable/disable thinking pose (true/false)
NEXT_PUBLIC_THINKING_POSE_ENABLED=false

# Pose ID to display while thinking
NEXT_PUBLIC_THINKING_POSE_ID=think
Configuration
You can configure this in the "Thinking Pose" section of the Character Settings tab.
- Turn on the toggle switch to enable the feature
- Select the pose to display while thinking from the dropdown
Behavior
- The specified pose is automatically applied when a message is sent
- When the AI response arrives, the pose switches according to the motion tag included in the response
- If the same pose as the thinking pose is specified by a motion tag, the pose continues without being reset
- The pose is automatically released when an error occurs or the AI response is empty
Pose Settings
A feature to apply poses to VRM characters. You can add, delete, and reorder poses from the Character Settings tab.
Pose Adjustment Mode
When you enable "Pose Adjustment Mode" in the Character Settings tab on the settings screen, pose buttons will appear on the screen. Clicking a button applies the corresponding pose to the character.
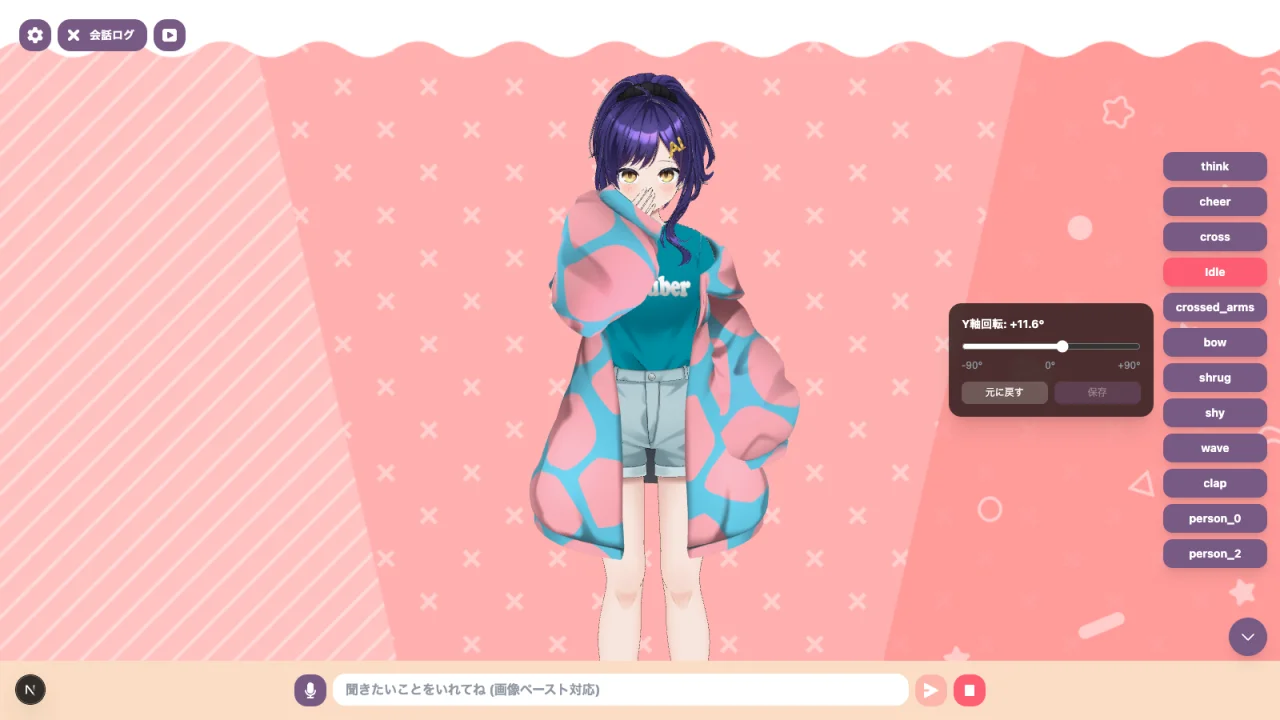
Pose Types
There are two types of poses:
- Normal Pose: Applies a fixed pose using a single pose JSON file
- Sequence Pose: Creates an animation by alternating between multiple pose JSON files (e.g., waving, clapping)
Default Poses
The following poses are available by default:
| Pose ID | Type | Description |
|---|---|---|
| think | Normal | Thinking pose |
| cheer | Normal | Cheering pose |
| cross | Normal | Cross (X) pose |
| mouth_cover | Normal | Mouth covering pose |
| crossed_arms | Normal | Arms crossed pose |
| bow | Normal | Bowing pose |
| shrug | Normal | Shrugging pose |
| shy | Normal | Shy pose |
| wave | Sequence | Waving animation |
| clap | Sequence | Clapping animation |
Adding Poses
You can add new poses from the "Pose Settings" section in the Character Settings tab.
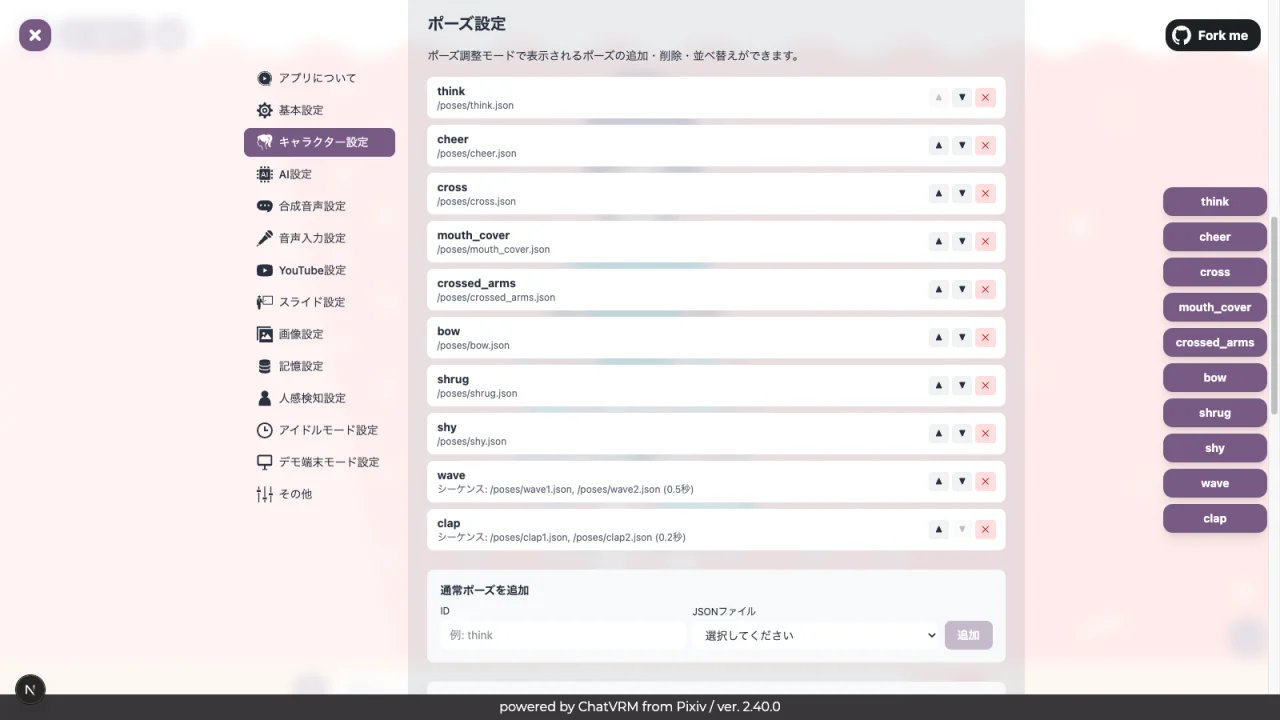
Adding Normal Poses
- Enter an ID (e.g.,
think) - Select a pose JSON file from the dropdown
- Click the "Add" button
Adding Sequence Poses
- Enter an ID (e.g.,
wave) - Select two or more JSON files to alternate between
- Set the switching interval in seconds (0.1 to 5.0 seconds)
- Click the "Add" button
Creating Custom Pose JSON
You can use custom poses by creating your own pose JSON files and placing them in the public/poses/ directory. VRM Web Pose format JSON is supported.
You can also use the scripts/vrma_to_json.py script to convert VRMA files to pose JSON.
Notes About Models
- Some models may take time to load during initial display
- Display may vary depending on the browser type and version
- Large VRM files may affect performance
About VRM Model Licenses
Be sure to check the license of the VRM model you use. There may be restrictions on commercial use or redistribution. When using VRM models, follow the creator's terms of use.